This page shows the moves of another chess game, also with a diagram for every move, to make it easy to read even without a chess board handy to play the game.
This game was played as part of a series of matches between the foremost players of two different countries, who were also seen as the two foremost chess players of Europe. Thus, although it would not be until many years later that a competition would formally be called the World Chess Championship, this contest was seen as one for world Chess supremacy.
Thus, unlike the informal game described on the previous page, there is no doubt about the moves of this game. However, the main primary source for the moves of the game is the book Chess Studies by George Walker published in 1844, ten years after the match: despite the matches receiving public attention, apparently the moves were not published at the time in a multiplicity of Chess magazines and even ordinary daily newspapers. That book was an anthology of a large number of games, although it included every game of the match (or almost every game; recent research has unearthed evidence some additional games were played): its full title was Chess Studies: Comprising One Thousand Games, Actually Played During the Past Half-Century; Presenting a Unique Collection of Classical and Brilliant Specimens of Chess Skill in Every Stage of the Game: and Thus Forming a Complete Encyclopedia of Reference.
Incidentally, descriptive Chess notation was still in its infancy when this book was written; a move like P-K4 would be noted as KP2; a move like N-KB3 would be noted as KN-B3. But at least it did exist as a compact form of notation; in earlier books, the moves would have been noted by "King's Pawn to his 2nd square" and "King's Knight to his Bishop's 3rd square" respectively; and, thus, it began as an abbreviated form of the conventional notation of Chess moves in complete sentences.
Some other games from this match were also highly praised, such as the 16th game and the 62nd game.
QUEEN'S GAMBIT
White: Louis-Charles Mahé de la Bourdonnais
Black: Alexander MacDonnell
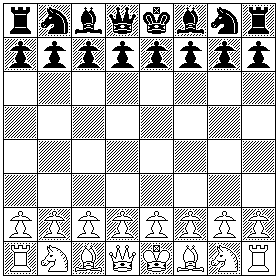
Again, we begin with a diagram of the initial state of the chessboard.
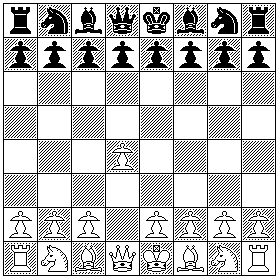
1. d4 P-Q4
This is also a very standard opening move. Again, one of the Pawns in the center of the array is advanced in an effort to control access to the important squares in the center of the board.
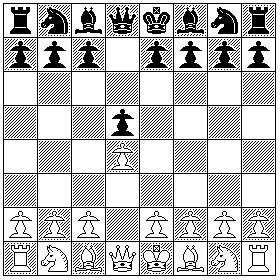
1. ... d5 ... P-Q4
For the same reason that P-K4 is the standard response to P-K4, P-Q4 is the standard response to P-Q4: White's drive to control the center is matched, and the Black Pawn is not in danger of capture where it has been moved.
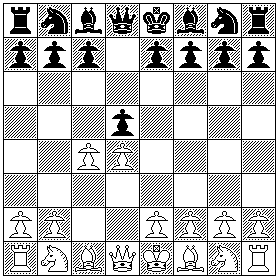
2. c4 P-QB4
White has now moved a pawn into a location where Black's pawn can capture it. This doesn't mean he has made a mistake; this too is a standard opening move. The opening is called the Queen's Gambit. A gambit is the act of offering a piece to be captured, in a speculative fashion, in the hopes that the positional advantages of the situation after the offered capture is made will outweigh the material disadvantage.
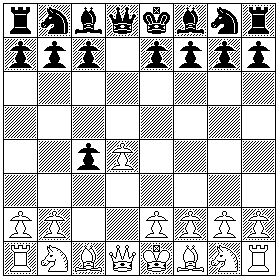
2. ... d x c4 ... P x P
Once again, the gambit has been accepted. In Chess games played during this period, players tended to accept gambits in the absence of a compelling reason not to do so.
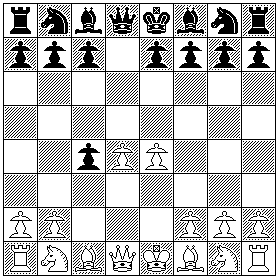
3. e4 P-K4
Since White has the opportunity to advance his King's Pawn and obtain control of the center, which is the goal of the Pawn sacrifice in the Queen's Gambit, he now takes that for which he has paid with a Pawn.
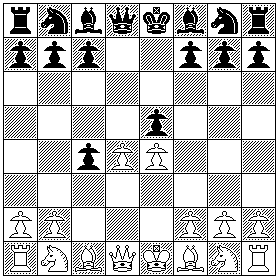
3. ... e4 ... P-K4
Despite Black's King's Pawn being exposed to capture, it seemed worthwhile to contest the centre, particularly as White would end up with doubled Pawns, thus damaging the quality of his own Pawn position, were he to capture Black's Pawn.
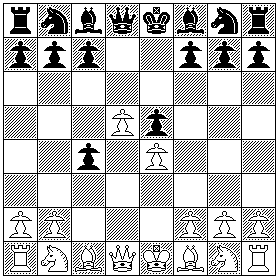
4. d5 P-Q5
While White won't capture Black's Pawn, neither will he just leave the Pawn that could make the capture just sitting there to be captured itself by the Black Pawn it could have captured.
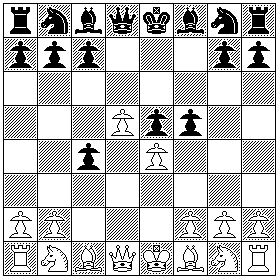
4. ... f4 ... P-KB4
Having the opportunity to do so, Black advances his King's Bishop Pawn.
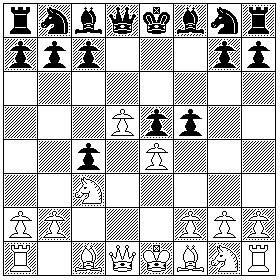
5. Nc3 N-QB3
A standard developing move, which also helps to open the way for Queen's-side Castling.
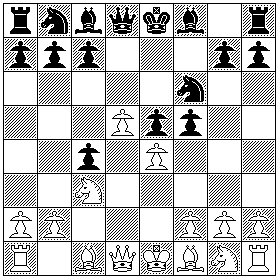
5. ... Nf6 ... N-KB3
Black also makes a similar standard developing move, this one opening the way for King's-side Castling.

6. Bxc4 BxP
White captures Black's Pawn, and develops his Bishop by bringing it out to the center of the board.
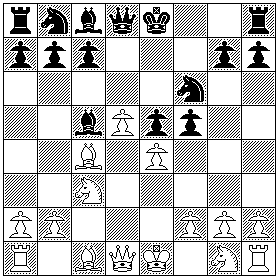
6. ... Bc5 ... B-B4
Black develops his Bishop to the corresponding square.
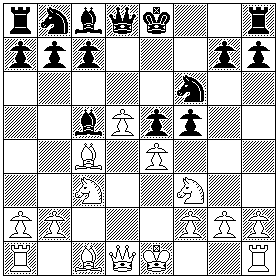
7. Nf3 N-B3
White brings out his other Bishop.
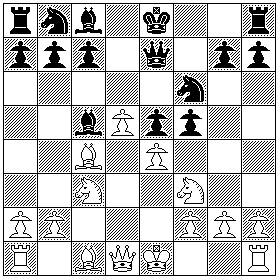
7. ... Qe2 ... Q-K2
Black makes an unusual move, bringing the Queen out early in the game. But it is supporting his Bishop alng the diagonal line linking them, which may have a tactical purpose.
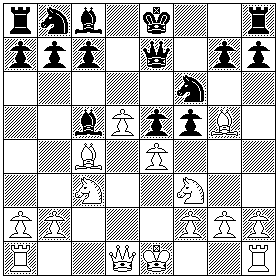
8. Bg5 B-N5
Since the Queen move didn't affect the fact that the Queen also protects the Knight, it's not clear that the move was related to what White has now done to put pressure on that Knight.
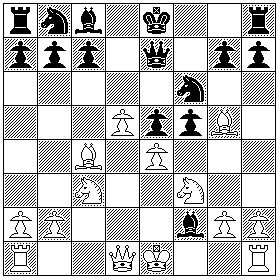
8. ... Bf2+ ... B-B7+
Black has now made an aggressive and decisive move, checking the White King.
The Bishop, however, can easily be captured, but only by the King. And if the King does so, Black can easily check the King again with his Queen. But there doesn't seem to be an obvious way where that would lead to checkmate, or even anything of consequence.
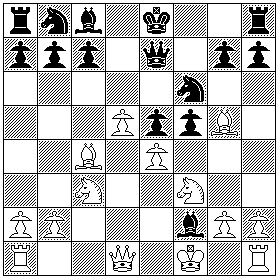
9. Kf1 K-N1
None the less, White didn't take the Bishop, and simply moved to where he was not in check. So there could be a serious threat which I failed to see.
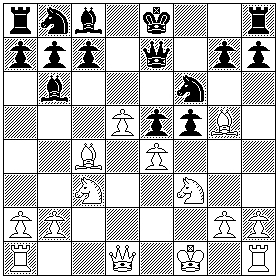
9. ... Bb7 ... B-N3
And yet, Black believes there's a real possibility that White will get around to capturing the Bishop later.
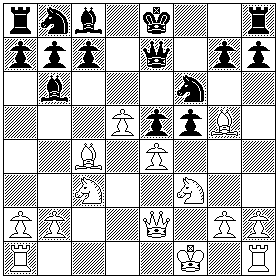
10. Qe2 Q-K2
And now White is making the Queen move that I found mysterious when Black made it.
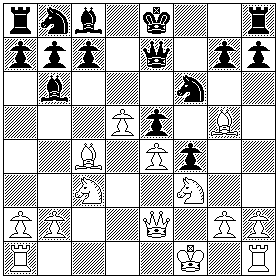
10. ... f4 ... P-B5
This advances a Pawn, and removes it from a square where it could be captured by another Pawn. On the new square, another Pawn defends it, so the fact that White's Bishop could capture it there is not a serious threat.
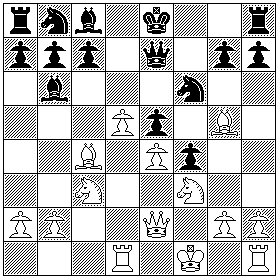
11. Rd1 R-Q1
White is now moving his King's Rook to a position from which it can enter the board. As well, it is supplying a third defender to the Pawn on that file, but that seems unlikely to be a significant aspect of this move.
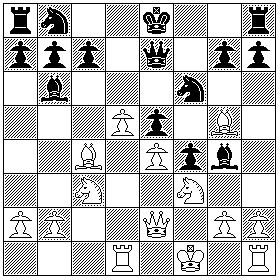
11. ... Bg4 ... B-N5
Black is now making a standard developing move with his Queen's Bishop, but in addition it pins White's Knight against his Queen.
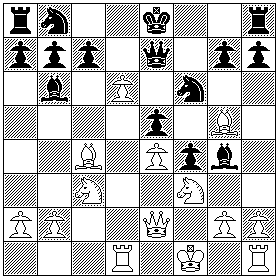
12. d6 P-Q6
Obviously, this won't lead to the capture of the Black Queen, but it will clear the file for White's Rook.

12. ... cxd6 ... PxP
Black does the obvious thing to save his Queen, as expected.
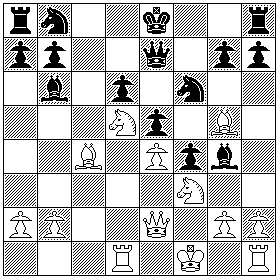
13. Nd5 N-Q5
White seems to be forcing Black to engage in an exchange of Knights.
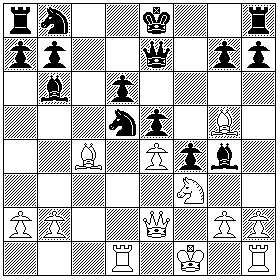
13. ... Nxd5 ... NxN
And Black sees no alternative.

14. Bxe7 BxQ
Oh, dear. That Knight was pinned, so White has something more valuable to take!
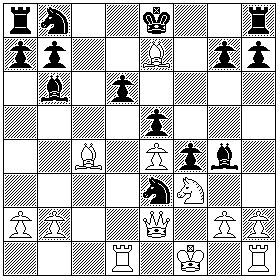
14. ... Ne3 ... N-K6
Black now forks the King and the Rook. And a Pawn protects the Knight, so White's Queen would be lost if the Queen captured it. So Black appears to stand to gain at least a Rook.
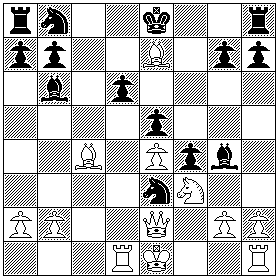
15. Ke1 K-K1
So White moves his King, leaving the Rook for Black to take.
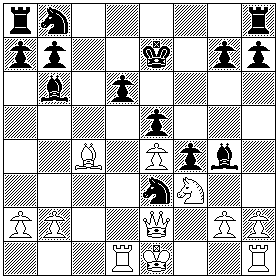
15. ... Kxe7 ... KxB
Instead, Black's King takes the Bishop, to ensure it can't threaten him.
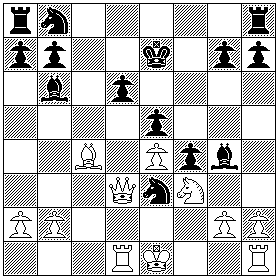
16. Qd3 Q-Q3
Now, White is moving his Queen so that the Rook is behind the Queen on the d-file. This threatens QxP+, which would put severe pressure on Black's King.
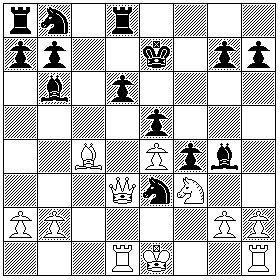
16. ... Rd8 ... R-Q1
By moving his Rook to that file, Black may be countering that threat, or making one of is own.
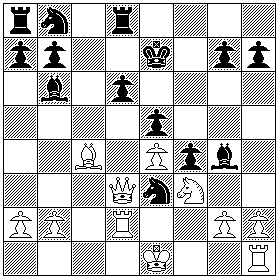
17. Rd2 R-Q2
Now, White is moving his Rook to safety from the attack of Black's Knight.
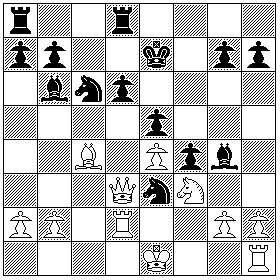
17. ... Nc6 ... N-KB3
And now Black develops his Knight to bring it into the fray.
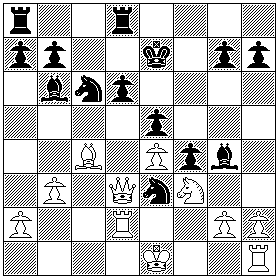
18. b3 P-QN3
Now, White advances a Pawn.
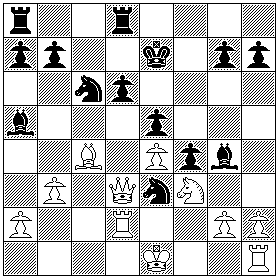
18. ... Ba5 ... B-R4
Black is pinning White's Rook against his King.
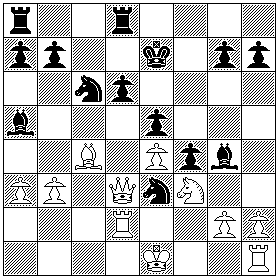
19. a2 P-QR2
White is advancing a Pawn. I would have been inclined to consider P-KN2, to deal with the Pawn defending Black's very dangerous Knight. It's not as if the option of King's-side Castling is still open.
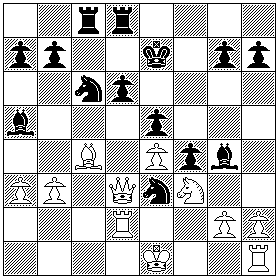
19. ... R/a-c1 ... R/QR1-N1
Black works towards bringing another Rook into play.
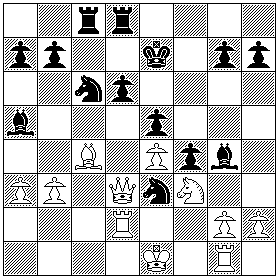
20. Rg1 R-N1
White is defending his Knight's Pawn, so perhaps an attack on the Black Pawn is coming.
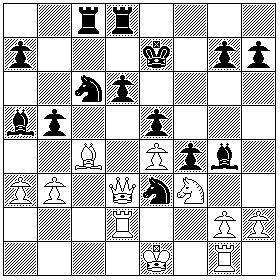
20. ... b5 ... P-QN4
Black advances a Pawn, and threatens the White Bishop.
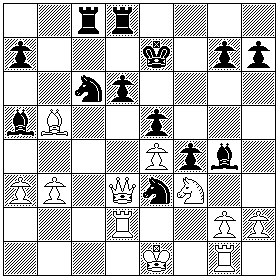
21. Bxb5 BxP
White responds by capturing the Pawn.
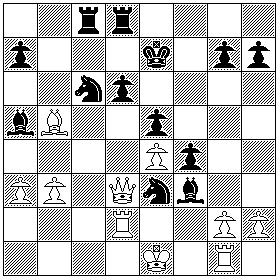
21. ... Nxf3 ... NxB
Black takes White's Knight with his Bishop.
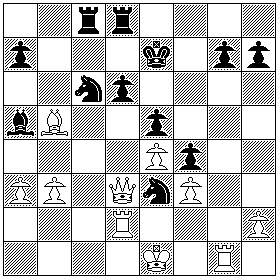
22. gxf3 PxB
But White feels safe in making the obvious reply.
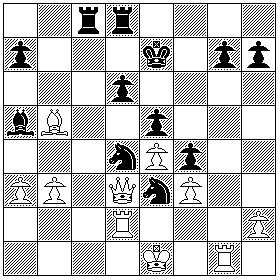
22. ... Nd4 ... N-Q5
And now Black moves his other Knight in. Already, it is forking a Bishop of White's and a Pawn; but if he takes that Pawn, he will be forking White's King and two Rooks, as well as another Pawn.
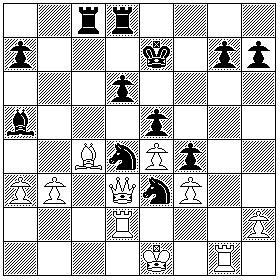
23. Bc4 B-B4
While moving the Bishop to where a different Knight can take it doesn't seem like a priority when Black is about to gain a Rook, this does put some pressure on Black's King.
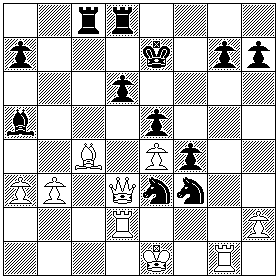
23. ... Nxf3 ... NxP/B6
Black continues with his deadly plan.

24. Kf2 K-N2
White, of course, must move his King out of check. He defends his undefended Rook by his choice of move.
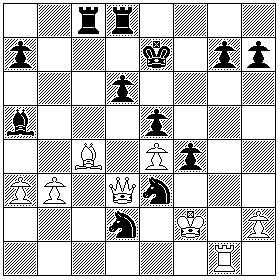
24. ... Nxd2 ... NxR/Q7
Black takes the Rook he has earned. His Bishop is defending his Knight from capture by White's Queen.
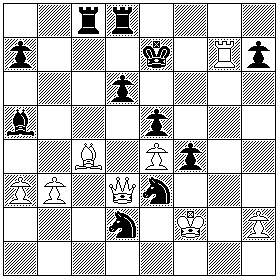
25. Rxg7+ RxP+
Now Black has to move his King out of check. But with just the lone Rook intruding into Black's side of the board, it is reasonable to doubt that Black can regain the initiative with this.
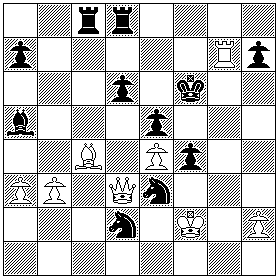
25. ... kf6 ... K-B3
Black moves his King out of check, threatening White's Rook.
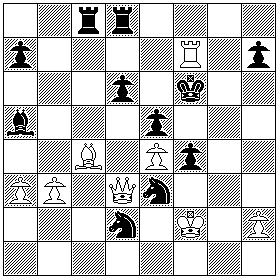
26. Rf7+ R-KB7+
White's Rook again checks Black's King, and it's defended by his Bishop. So White's position had at least some resources.

26. ... Kg6 ... K-N6
Black moves his King out of check again.
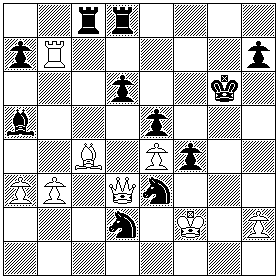
27. Rb7 R-QN7
And since White is retreating his Rook, it seems like his attack has run out of steam.
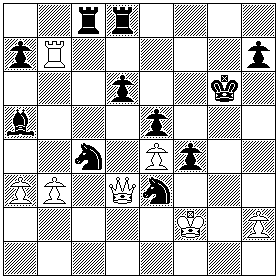
27. ... Nxc4 ... NxB
Black takes White's Bishop, but a Pawn can take his Knight, so the fact that his other Knight is defending it is no help. Still, this is an even exchange.
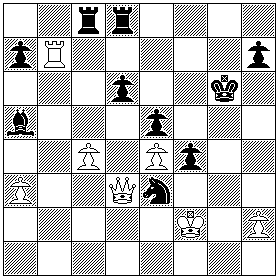
28. bxc4 PxN
And, indeed, White does take the Knight with his Pawn.
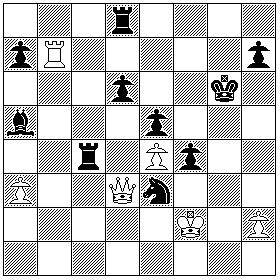
28. ... Rxd4 ... RxP
And White takes the Pawn with his Rook! It's true that his Knight would take the Queen were it to capture the Rook, so it is safe enough, but this seems like a lot of effort to capture a Pawn. But, on the other hand, if the goal is to clear an open file from which to check White's King, that's a different matter.
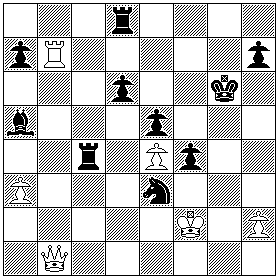
29. Qb1 Q-N1
White retreats his Queen to where it defends his Rook.
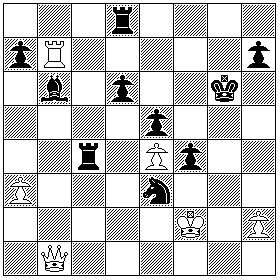
29. ... Bb6 ... B-N3
Black seems to be trying to forestall an attack on his King, but this would seem to only delay it at the cost of a Bishop. But fortunately, the Bishop is defended by a Pawn, and it defends that Pawn as well, so White's Rook can't simply take it to begin clearing the file.
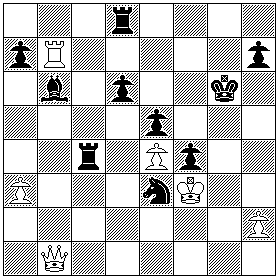
30. Kf3 K-B3
White seems to be moving his King to greater safety, since now Black's Knight cannot put him in check with a single move.
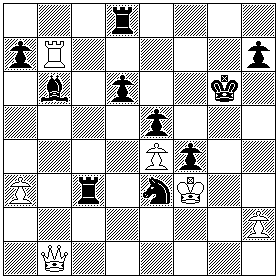
30. ... Rc3 ... R-B6
Black surely has more on his mind than threatening a Pawn. He could move his Knight away, leading to a discovered check on White's King; this form of check is often more dangerous than more routine ones.
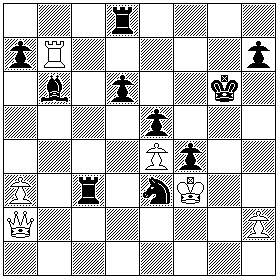
31. Qa2 Q-R2
White seems to be giving up on opening a file to attack Black's King for the moment. This move might block some forms of attack on his own King.
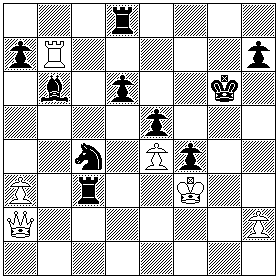
31. ... Nc4+ ... N-N5+
Black is now beginning his offensive with a discovered check.
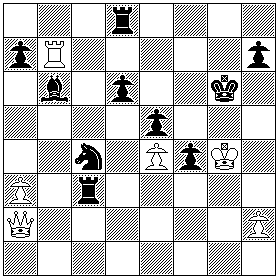
32. Kg4 K-N4
White moves out of check.
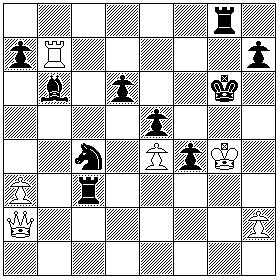
32. ... Rg8 ... R-KN1
Black brings his Rook in, threatening another discovered check.
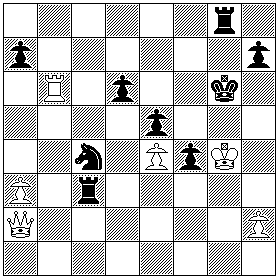
33. Rxb6 RxB
White sacrifices his Rook to eliminate Black's Bishop. It's true Black's Bishop could swoop in to block the one square of retreat for White's King, but White's Queen could have taken it in that case. Was the Bishop the real threat?
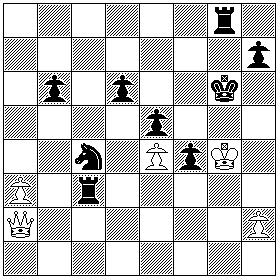
33. ... Pxb6 ... PxR
Black, at least, feels he can afford to take the time to capture that Rook, and so Black now has two Rooks and a Knight to White's Queen.
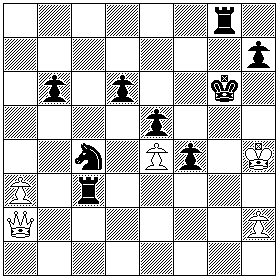
34. Kh4 K-R4
White moves his King out of the way of the threat of a discovered check.
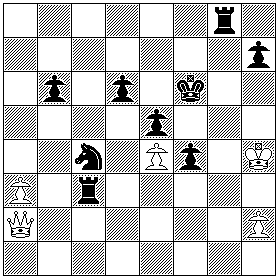
34. ... Kf6 ... K-B3
But Black still moves his King. But this opens up one square to which White's King can move.
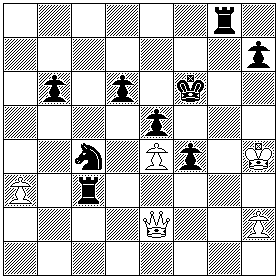
35. Qe2 Q-K2
White moves his Queen to where it might be able to take an active part in defending his King.
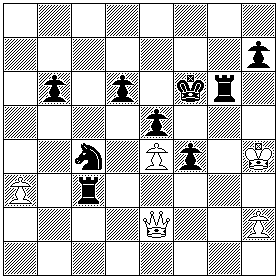
35. ... Rg3 ... R-N3
Black is clearly pressing his attack, but he is still leaving the one square of retreat open for White's King. Of course, though, it's not a very good square of retreat, since if White's King moves there, R-R6 will bring an immediate checkmate.
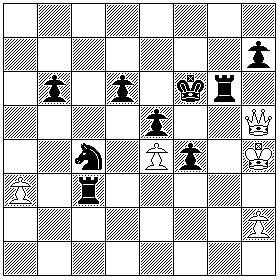
36. Qe2 Q-K2
White moves his Queen again, blocking the useless square of retreat for his King. Stalemate is not an issue, since White can always move his Queen or advance a Pawn, but this does threaten a Queen sacrifice to eliminate the Rook so handy in attacking his King.
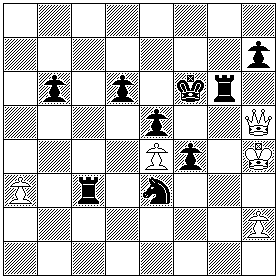
36. ... Ne3 ... N-K6
Black, however, still has a Knight as well as another Rook, and with one more move, the Knight can give check to the trapped King.
37. Resigns