Most digital cameras use a rectangular array of light-sensing elements which have color filters placed over them in a regular pattern. Some expensive video cameras will use a set of three light-sensing elements, and for large-format cameras, one company (Better Light Back) makes a scanning sensor that produces a high-quality image. Also, another company (Foveon) makes an image sensor that places three layers of sensors one over the other. But a single array of sensors with a color filter array over it is the simplest solution to make, and its disadvantages will be overcome as it becomes possible to make larger arrays at higher densities. Replacing each image sensor by a 6 by 6 array of sensors, but leaving the resolution of the final image the same rather than increasing it sixfold would allow any image quality issues due to demosaicing to be avoided.
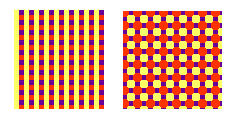
At one time, early color films were made by putting color filters over black-and-white film, such as in the Autochrome process of the Brothers Lumiére, where particles of starch dyed red, green, and blue were used, or Dufaycolor, which used yellow stripes crossed by blue and red stripes, so that half the area was devoted to yellow, and the area between the yellow stripes was half red and half blue, or even the Finlay process, which used a layout similar to the modern Bayer pattern, except that blue, being less bright, was the one reproduced twice, and, again, as with Dufaycolor, the three colors were a purplish blue, a slightly greenish light yellow, and a somewhat orangeish red.

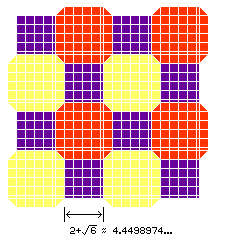
The diagram above illustrates the Dufaycolor and Finlay arrangements. Note that in the Finlay arrangement, the corners of the yellow areas are rounded, and overlap with those of the red areas, so that the blue areas are smaller. Thus, the blue areas are smaller. It would be possible to make the areas devoted to each of the three colors equal by making the yellow and red areas suitably enlarged octagons, as illustrated in the diagram below:
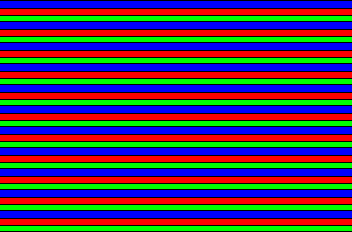
Much later, when Polaroid made film that could be used in ordinary cameras, and then developed rapidly, for color film they also had to use an additive process. Polacolor CS film, as well as Polavision motion picture film before it, used stripes of color of varying width, as shown in the diagram below:
Modern color film is all made by having successive layers sensitive to each color. Since the photosensitive material used in film is normally sensitive only to blue, and needs to be chemically modified, or "sensitized", to other colors, one can have a top layer that has not been senzitized, and which reacts only to blue light, with a yellow filter under it to block the blue light, followed by a middle layer that is, like the old orthochromatic black-and-white film, sensitized to most visible light, but not red light, with a red filter under it, and a bottom layer which is now, like a panchromatic emulsion, sensitive to red light (and presumably all other colors, but only red reaches it). This principle, combining layers of filters that successively remove components of the incoming light with layers of photographic emulsion that are successively sensitive to more components of the incoming light is illustrated by the diagram below, similar to diagrams seen in many books on color photography:
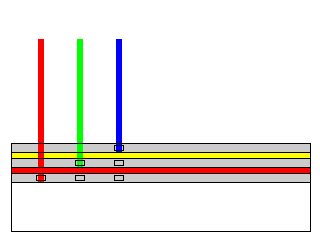
Red and yellow filters would be suitable to a device like the Foveon sensor as well, but here the red and green components would simply be subtracted electronically, the light sensors in all layers being sensitive to all wavelengths. In the actual Foveon sensor, the light transmission of silicon is used to perform the filtering, and the sensors are constructed so that the sensor nearest the surface is predominantly sensitive to blue light, and so on.
Recently, Foveon introduced an improved version of their sensor, the Quattro, where the resolution of the topmost layer of pixels in the sensor is doubled. Since four pixels in that layer can still have their signals added together, the exact match of images for the three colors is retained, but in addition, luminance information at double the resolution is available.
With a good antialiasing filter, a Bayer-array sensor would produce a result equivalent to that from the original style of Foveon sensor, but presumably it's difficult to get antialiasing just right.
Another scheme, used by many camera makers, attempts to approximate what the Foveon sensor achieves with ordinary Bayer array sensors by taking multiple exposures and shifting the sensor between shots, so that the different colors of filter are moved to every pixel location in the image. Initially, at least, cameras using this technology could only use that feature if mounted on a tripod and taking pictures of well-lit subjects, so that it is not fully competitive with a Foveon sensor. On the other hand, because a wide choice of dyes is available for the filters in a Bayer array sensor, images with more vivid or more natural color may be possible.
A third possibility would be to use dichroic mirrors to split the incoming light into three color ranges, each going to its own unfiltered sensor. This approach was used with black-and-white panchromatic film in the early days of color photography, it was used in early color television cameras using vidicon and plumbicon tubes, and it was later used in professional video cameras with CCD sensors. It is still used in 3 CCD cameras for industrial uses and medical endoscopy, but it has not been offered in still picture cameras aimed at photographers.
However, one of the earliest digital SLR cameras, apparently the earliest which did not require bulky electronics external to the camera body, the Minolta RD-175 (also sold as the Agfa ActionCam), used three sensors with the light split; instead of dividing the light into red, green, and blue, however, one sensor still had a filter array, and was used for determining the red-light and blue-light components of the image, whereas the other two were used for the green image; it appears this was done to improve the camera's resolution compared to that of the 768 by 494 pixels each of the three CCD sensors had.
Panasonic, in 2013, announced a new type of image sensor using "Micro Color Splitters" in front of the sensor array; one benefit was improved sensitivity, since the colors would be separated instead of selectively absorbed.
The process used diffraction to split the colors, and the illustration of how the process worked showed only two types of pixel, allowing only two-color images. Whether this was merely an over-simplification for ease of explanation, or whether difficulties in modifying the process for three-color imaging are the reason that products using this did not become available after 2013, is not clear.
And Lumos Imaging is working on commercializing a type of sensor that apparently uses interference between pixels with different phase delays to analyze the color content of an image. They are looking at less expensive sensors for smartphones, rather than high-quality imaging applications for their initial product, however.
Recently, a team of researchers at ETH (Eidgenössische Technische Hochschule) Zurich and EMPA (Eidgenössische Materialprüfungs- und Versuchsanstalt für Industrie, Bauwesen und Gewerbe) led by Maksym Kovalenko used lead halide perovskites to make an experimental stacked image sensor which captures light of different wavelengths in its different layers. While this is the same basic principle as used in the Foveon sensor, because these lead halide perovskites are more transparent than silicon, the sensors can have up to 30 layers. This makes this type of sensor primarily useful for specialized imaging applications for scientific purposes, but it may also have potential for use in ordinary color photography as well.
While sensor arrays are made in the 24 by 36 millimeter size which is the film size for a 35mm camera, such as the Philips FTF 3020-C, at one time, in general such large sensors were only used in backs for medium format cameras (although now larger image sensors, 36 by 36 millimeter, or 36 by 48 millimeter, are also available for medium format digital cameras), and digital SLR cameras, while accepting lenses designed for 35mm film cameras, use smaller sensors.
More recently, a number of companies making 35mm digital SLR cameras did offer full frame sensors in some of their more expensive models. And this has now been going on for so long that working full-frame DSLRs are now available inexpensively on the second-hand market.
The diagram below
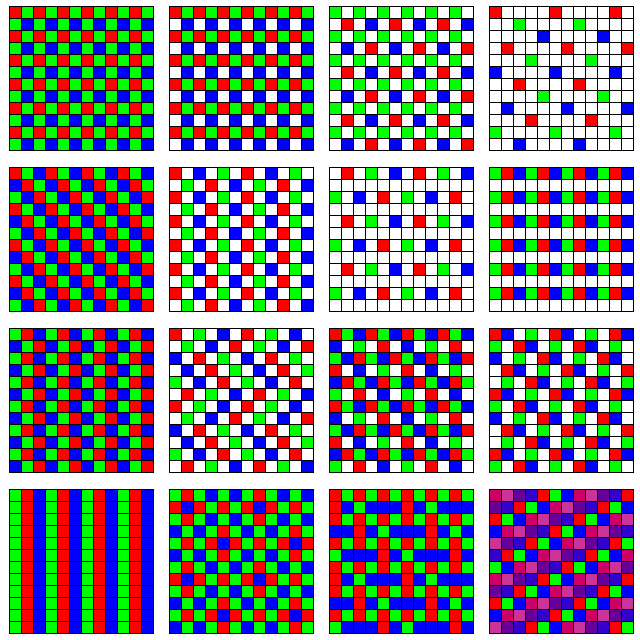
shows a few of the many possible arrangements
In the first row, the first arrangement is the one almost universally used with color digital cameras, known as the Bayer pattern, after Bryce E. Bayer, who invented it for Eastman Kodak. This is covered by U.S. patent 3,971,065, granted on July 20, 1976. The patent was applied for in March, 1975. In addition to the form shown there, one in which the green-filtered pixels are replaced by unfiltered pixels is mentioned in the patent. The resolution of each color is reduced by as little as possible through the use of a 2x2 cell, and, of the three colors, green is the one chosen to be sensed twice in each cell as it is the one to which the eye is most sensitive. The next arrangement is one possible alternative that treats all colors equally; instead of sensing green more often, use an unfiltered sensor to directly obtain the full black-and-white image. The third arrangement accepts that green is more important than red or blue, but treats the black-and-white image as the fundamental one, so half the sensors capture that, a quarter of them the green image, and one-eighth each the blue and red images. This arrangement is the one used by SONY in an RGBW color filter array which it manufactured, and which was used in some smartphones. The fourth superimposes a Bayer pattern at an even lower density on what are mostly unfiltered sensors, so that four-fifths of the sensors are unfiltered, one-tenth green, and one-twentieth each red and blue.
An arrangement like the second one shown above, but with the fourth group of sensors filtered for a blue-green color called 'Emerald', is actually used by Sony in one of its products. Some discussions of this sensor have noted that the 'Emerald' color looks like cyan; it certainly is true that it is similar in apparent color to the unaided eye, but a cyan filter is normally thought of as one that admits the sum of the light admitted by a blue filter and a green filter. If a cyan filter were added to red, green, and blue filters, therefore, it would not add anything to the color discrimination abilities of an image sensor. A filter excluding yellowish-green and violet, on the other hand, would make a material contribution despite still looking blue-green in color when merely looked at.
However, after an 8 megapixel sensor using the Emerald color was used in the Cyber-Shot DSC-F828 from 2003, the feature was not considered to be a success, and SONY did not use it again on any of their products.
In the second row, another simple way to treat all three colors equally is shown in the first arrangement, through the use of alternating diagonal stripes. Using a 3x3 cell, red, green, and blue pixels are distributed symmetrically within each cell. The second shows half the pixels unfiltered, and with the others being red, green, and blue in alternating columns. The third attempts to distribute the red, green, and blue filters in an approximate triangular array, with most pixels unfiltered, and the fourth provides a distribution of pixels similar to that of the second, but with the unfiltered pixels in horizontal stripes instead of arranged diagonally.
The third row begins with an arrangement that uses a 3x2 cell as the basic unit to treat all colors equally and yet have a simple distribution of cells. The second has half the cells unfiltered, and attempts to avoid artifacting by alternating between RGB and RBG order, and left- and right- leaning diagonal stripes, in groups of three rows at a time. The third uses a 2x2 cell, and leaves the unfiltered cell in a fixed position in the cell, but cycles through three possible orderings for the three colors within the cell on a regular basis. The fourth uses another approach to avoid artifacting on vertical, horizontal, or diagonal lines; here, in columns, red, green, and blue are followed by two unfiltered pixels in each column, and the columns are shifted three places down from one to the next.
The fourth row begins with the simplest way to treat red, green, and blue equally, by using alternating stripes. The second arrangement uses alternating 3x3 cells with either four red, four green and one blue, or one red, four green and four blue, filters symmetrically disposed. The third uses 2x2 cells which have one red, one green, and one blue element assigned, and with the fourth element distributed according to placing red, green, and blue in successive diagonals. The fourth shows how the problem becomes relatively simpler if seven colors are used, for example, medium and near IR, red, green, blue, near and medium UV, as might be useful in astronomy.
Not shown here are arrays that deal with artifacting by being wholly or partly pseudorandom, which have also been proposed.
One of the reasons that large detectors are expensive is because image-sensing arrays with defective pixels are greatly reduced in usefulness. The first of the three arrays depicted below shows one idea I had for an array that was tolerant of defective elements:
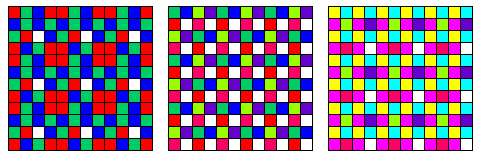
Its basis was a 4 by 4 cell with five each of red, green, and blue elements, and one unfiltered element, approximating red plus green plus blue. If some elements were defective, those remaining would be able to supply red, green, and blue values from within the 4 by 4 cell, even with a relatively symmetric arrangement.
Then it occurred to me that the second arrangement in the larger chart above, when the fourth cell is unfiltered, was itself defect-tolerant; if unfiltered is red plus green plus blue, any one defective element in a 2 by 2 cell could replace the others. Of course, another repurposing of the duplicate green element in a Bayer pattern cell would be a fourth color to provide better color accuracy, as SONY did with an "Emerald" color, available with its DSC F828 camera.
I decided on a color favoring yellow light rather than a blue-green, such as SONY's "emerald", as the other extra color because the CIE chromaticity diagram is more curved on the red/green side than the green/blue side, and blue/green colors are generally not perceived by people as vividly colored. Instead of yellow, an amber or even orange filter might be chosen, or, for that matter, a yellowish-green. Chartreuse, anyone?
Initially, I had wanted to use "magenta" to denote a filter which favors the more extremely long red wavelengths, just as I was going to call the filter which most readily admitted the yellow part of the spectrum, but which passed reduced amounts of orange and red light in one direction, and green and blue in the other, simply "yellow". The idea is that a magenta-filtered sensor element would have a sensitivity curve peaking near the longest wavelengths of visible light, decreasing as one goes to the spectrum, but not going to zero, if possible, even at the other end of the spectrum, at least not going to zero before blue is reached, and similarly, a violet-filtered sensor element would have a sensitivity peaking near the shortest wavelengths of visible light, decreasing as one goes over to red at the other end. But the word magenta and the word yellow are used with a distinct technical meaning in the printing industry, where cyan, magenta, and yellow are the three subtractive primaries, it seemed desirable to seek an alternative nomenclature. Therefore, I allowed myself to be inspired by SONY's choice of nomenclature, and, to avoid confusion in my name for a deep red filter, instead of calling it magenta, I could refer to it as "ruby" in color. Violet, Chartreuse, and Ruby, then, are used to designate the second set of three colors.
So, in the second arrangement, I alternate red/green/blue/white cells with ruby/chartreuse/violet/white cells, with the intention of providing higher accuracy in color reproduction.
The white cells occur twice as often, but, in addition, one can process the red and ruby cells together to obtain red brightness and red fine color information using the same general technique as is used for normal demosaicing, and the blue and violet, and the green and chartreuse, as well as green, chartreuse, and white, so this particular arrangement suggests interesting mathematical possibilities for a nested demosaicing technique.
Speaking of the subtractive primaries, Kodak used an image sensor in the DCS620x camera that used a cell with two yellow filters, one cyan filter, and one magenta filter, where yellow = red + green, cyan = blue + green, and magenta = blue + red. This gave the same color fidelity as a standard Bayer filter array, but allowed twice as much light to reach each light-sensing element, thereby allowing shorter exposure times. Sony makes cyan, magenta, yellow, and green array image sensors for use in TV cameras, such as the ICS429.
Finally, the third arrangement tries to return to high image resolution, and gain the more efficient use of light provided by the subtractive primaries, by putting cyan, magenta, and yellow in every 2 x 2 cell, and alternating the fourth cell between violet, chartreuse, ruby and unfiltered, treating higher color accuracy as a luxury feature given a lower spatial resolution. This loses the defect tolerance retained in the previous design.
This diagram shows the major types of CFA that are in actual use:

First, the Bayer pattern, used in almost all digital cameras. Second, a Bayer pattern using the subtractive primaries, as Kodak used in the DCS620x. Third, the Red/Green/Blue plus Emerald filter that SONY introduced with the DCS F828 for improved color. Fourth, a cyan, magenta, yellow, and green array, used by many companies for video cameras to provide a compromise between maximum light sensitivity and high color quality. Fifth, a yellow/cyan/green/unfiltered array that apparenly originated at Hitachi and which is used by JVC in some of its video cameras.
Here is a chart showing the light sensitivity curves of some important image detectors:
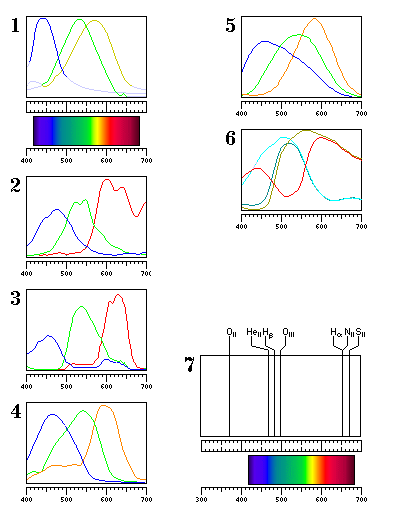
Chart 1 shows the sensitivity curves of the light-sensing substances in the human eye, as determined by the pioneering work of George Wald (like Dennis Gabor and Gabriel Lippman, to be mentioned below, a Nobel laureate). However, I have extended the red, green, and orange curves to cover the whole spectrum in an arbitrary manner; my extensions are indicated by being in light grey. A proper way to extend those curves would be to attempt to match the behavior of the CIE chromaticity standard (the original 1931 one for foveal vision) with them, and some work is being done on relating the CIE standard to our current knowledge about the actual workings of the eye. Chart 2 shows a typical set of sensitivity curves for a CCD, as used in a 36mm by 24mm image sensor by Philips. Chart 3 shows sensitivity curves for red, green, and blue filters by Kodak which are made from advanced pigments which also allow the creation of matching cyan, yellow, and magenta filters. Chart 4 shows the blue, green, and orange filters described in an Intel patent. Chart 5 shows the sensitivity curves for the three types of sensors in a Foveon array. Chart 6 shows the sensitivity curves for the SONY Super HAD II filter; this appears to be the filter for video cameras mentioned above, rather than the one with the Emerald color used in still picture cameras.
Chart 7 shows the position of several spectral lines popular in astronomical imaging. Thus, for example, the famous Hubble palette assigns the red Sulfur II line (from the +1 ion of Sulfur) to the R layer, the Hydrogen alpha line to the G layer (although it too is red and not green), and the Oxygen III line (from the +2 ion of Oxygen) to the B layer (although it is green and not blue).
Note that while the Nitrogen II line and the Hydrogen alpha line aren't separate on the scale of the diagram, they can be separated by narrowband optical filters; such filters are even available to amateur astronomers from Astrodon, for example.
Of course, when only tiny slivers of the spectrum are used, longer exposure times are required.
Presumably, the ideal set of color filter dyes would be one in which the three types of color sensing elements have curves which could be linearly combined to match the three pigments in the human eye. This condition, but usually with reference to the tristimulus values used for the CIE chromaticity diagram instead, is called the Luther condition.
From this perspective, the effort Kodak made to design dyes that neatly admitted only one each of red, green, and blue, as shown in section 3 of the diagram above, is going in precisely the wrong direction, since a color filter array using those three dyes would register light at 410 nm and light at 460 nm both as simply pure blue, rather than the light at 410 nm being shown as deeper in hue than the light at 460 nm.
Despite this, a maker of 3 CCD cameras for specialized imaging applications has used as a selling point that a dichroic mirror splits the light into red, green, and blue groups with little overlap.
The type of improved image sensing array that is currently popular, however, perhaps is more like this:
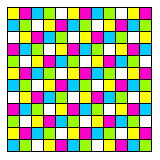
The basic repeating pattern here is:
Ye Ma
Cy Ch Y
so the basic cell consists of five colors. Red/Green/Blue information is obtained through Cyan, Magenta, and Yellow filters (of the subtractive kind) so that each pixel recieves roughly 2/3 instead of 1/3 of the available light; one additional color, here denoted by Chartreuse, obtains additional color information, substituting for the fact that the basic red, green, and blue response curves don't match those of the human eye, and in addition, one unfiltered cell both provides some redundancy against bad pixels, and also provides some more additional color information (since the red + green + blue used don't exactly equal an unfiltered pixel) at the highest possible efficiency.
Such a pattern avoids omitting any color from any row or column. Of course, one can still follow paths at knight's-move angles through such a sensor which are restricted in the types of pixels found, but because this doesn't match the edges of the pixels itself, and is a less common direction than verticals and horizontals, some reduction in artifacts, if not their elimination, can legitimately be claimed.
Another nice property is that the four nearest orthogonal neighbors, and the four diagonal nearest neighbors, of each cell contain the four other cell types, and the two occurrences of any one color are as nearly opposite as possible for one diagonal neighbor and one orthogonal neighbor, being separated by a Knight's move.
Perhaps the biggest problem in deriving a color image from the signal sensed by a CCD imager with a color filter array over it is distinguishing fine detail in the brightness domain from effects caused by the interaction between the color of the scene in an area with the pattern of colors assigned to the pixels.
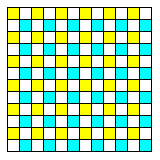
As a result, arrays like the above have been proposed. Here, every second pixel is unfiltered, giving detailed luminance information about the scene. Color information is obtained through alternating cyan and yellow pixels. Although there are no red or blue pixels, red can be determined from white minus cyan, and blue from white minus yellow. Letting a lot of light reach each pixel reduces noise in the luminance information, although the part of the signal that indicates the difference between colors is not any stronger for a cyan/magenta/yellow array than a red/green/blue array.
Combining the ideas in the two arrays described can lead to some very complicated types of arrays.
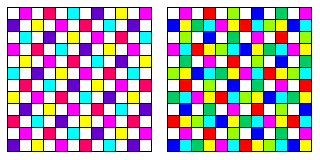
In the first array, the cells are first divided into two groups, like the squares of a checkerboard. One group then consists only of unfiltered cells, and the other consists of repetitions of a basic five-cell unit:
   Ru
Vi    Cy
   Ma
      Ye
Having half the cells unfiltered maximizes the amount of luminance information, and using a five-cell construct for the colors helps reduce artifacts.
The second array also divides the cells into two groups, like the squares of a checkerboard. But in this case, one group consists of repetitions of the following four-cell group:
   W
Cy    Ye
   W
two unfiltered cells with one each of cyan and yellow, to allow this group of cells to have maximum sensitivity to light, while still providing full tristimulus color information, and the other group consists of repetitions of this five-cell group:
   R
G     Ma
   B
      Ch
where the R, G, B are chosen from a different set of pigments than those which would give strict complementarity with cyan, magenta, and yellow; the magenta is the one that belongs with the cyan and yellow of the other group, and the other color, chartreuse, is one chosen to enhance the color information as much as possible.
The following diagram may make the underlying structure of this complex array clearer:

Clearly, an array of this type would require more complex signal processing than the kinds of arrays used typically, and it may not necessarily provide sufficiently improved color rendering to make it worthwhile.
However, it just dawned on me that this relatively simple array is perhaps the obvious design:
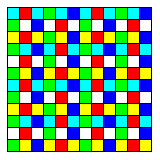
The square cells are divided into two groups by means of a checkerboard pattern. One group consists of horizontal stripes of cyan, white, and yellow, and the other of vertical stripes of red, green, and blue.
Thus, two three-cell patterns are used, rather than a four-cell pattern, and since one is of vertical stripes, and the other is of horizontal stripes, they complement each other in terms of image detail.
Also, I recently read that Fujifilm's Super CCD SR II image sensor addressed one problem with CCD image sensors as compared to film by having an array divided into two sizes of pixel, so that if an image was slightly overexposed, so that the larger pixel sensors were saturated, an image with proper contrast could be obtained from the smaller pixels. The large pixels were octagonal, and in the square areas between their corners, smaller square pixels were placed.
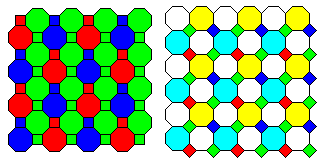
The diagram on the left shows what I believe the color filter array of the Fujifilm CCD SR II to be, having the same pattern of color filters on both sizes of pixel. On the right is illustrated how the difference in sizes could be augmented by the use of a yellow/cyan/unfiltered array for the large pixels, that lets in more light, and a red/blue/green array, letting in less light for the small pixels.
This is not the same as the original form of Fujifilm's Super CCD SR, which uses octagonal microlenses, with the square areas between them unused, but with two sensors of different sizes beneath each microlens. Another characteristic their sensor has is that the columns of octagons are staggered, similar to rotating the diagram above by 45 degrees. One account on the web claims that Fujifilm's original Super CCD sensors used pixels that were hexagonal, but this appears to be mistaken; this, like the 45 degree rotation, may decrease artifacting.
Advertisements for more recent cameras from Fujifilm, however, no longer mention the Super CCD technology. It may well be that economies of scale and continuing improvement in standard CCDs have made it impractical to continue with a specialized design. Given that, I had been thinking that perhaps an array like this:
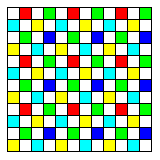
replacing the Bayer pattern on a conventional CCD of square pixels might provide some of the advantages of the various improved designs that have been tried.
Every second pixel is unfiltered, to allow a high-resolution luminance image to serve as a reference.
The remaining pixels are divided into two groups.
Half of them are alternating yellow and cyan pixels. Together with the unfiltered pixels, they can provide a color image at low light levels.
The other half are red, green, and blue pixels in the conventional Bayer pattern. Using these at high light levels allows expanded dynamic range, just as the Super CCD technology provides in a different way.
However, this arrangement has one limitation compared to the Bayer pattern.
The diagram below
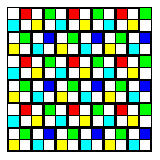
shows how the image area can be divided into 2x2 pixel squares from which the three components, R, G, and B, of the light on that square, presuming it is uniform, can be derived.
The rows of squares are staggerred because there are some 2x2 squares on the layout, unlike the case with the Bayer pattern, where this is not possible:
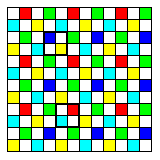
Here, the heavy outlines show one square with two white pixels, a yellow pixel, and a blue pixel, and another square with two white pixels, a cyan pixel, and a red pixel.
Since:
White   = R + G + B
Yellow  = R + G
Blue    =         B
in the former case, red and green light can't be distinguished when only white, yellow, and blue pixels are available, and since
White   = R + G + B
Cyan    =     G + B
Red     = R
in the second case, green and blue light can't be distinguished where only white, cyan, and red pixels are available.
However, a reduction in color resolution is simply an expected tradeoff of this design.
The problem of not really knowing if the difference in signal between pixels of different colors is due to color or fine detail is reduced in this design, because every second pixel is unfiltered. That, though, would also be achieved in a simple Bayer-like white/cyan/yellow design.
If an antialiasing layer is used, then the virtues of the relatively expensive Foveon image sensors are approached.
In fact, however, I see that Fujifilm has gone in a different direction.
The image below shows their X-Trans filter array arrangement:
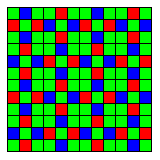
which is aimed at reducing artifacting in the image by providing a less regular pattern than the Bayer array.
This arrangement inspired me to attempt to convert my design with clear, cyan, and yellow octagons, and red, green, and blue diamonds to square pixels in another way:
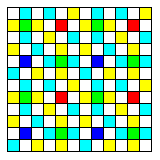
The array is divided into 3 by 3 arrays of cells; the central element in each cell is red, green, or blue, in a Bayer pattern, and the remaining eight elements are clear, cyan, and yellow, in an attempt at an alternating pattern.
However, the different goal of the X-Trans filter does not mean that Fujifilm has entirely given up on addressing dynamic range through innovative filter designs. This illustration shows their EXR color filter array:
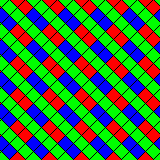
which groups the pixels for each color in pairs, thus allowing the two pixels in a pair to be binned for greater sensitivity.
Even more recently, Blackmagic, a firm that makes high-quality digital movie cameras, has devised a novel RGBW filter design for its URSA Cine 12K camera. The design of this filter is shown below:
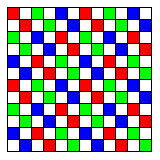
Having every second pixel unfiltered is an obvious good idea, as it allows the most important information about an image, the luminance information, to be captured at a high resolution.
That the number of red, green, and blue pixels is equal is an optimization of the color resolution, as opposed to preserving the arrangement of the Bayer pattern, but on the diagonal axis, which seemed to me to be the "obvious" way of designing a color filter array with half the pixels unfiltered.
But what seemed unusual to me was the fact that the colored pixels were grouped in diagonal pairs. However, the arrangement is such that each unfiltered pixel still has colored pixels of all three colors among those which are immediately adjacent to it, and thus this pairing need not necessarily result in a reduction in the resolution of color information.
The reason for this aspect of the design is that the Blackmagic URSA Cine 12K camera may record video at 4K and 8K resolution in addition to 12K resolution, and it is intended to produce the highest quality video at each resolution, free from artifacts.
The diagram below shows how binning can achieve this for a 6K resolution:

However, it is unclear to me how this particular scheme of binning would help with other resolutions. In the case of 4K, one could bin together the four or five unfiltered pixels in each 3 by 3 area, but downsampling would have to be done in a conventional manner for the color information, as far as I can see.
The Blackmagic patent for this color filter array, and the methods used for processing its images, cites a previous color filter array design with pairs of colored pixels, but which was still patterned after the Bayer design, as prior art. This design, shown below,
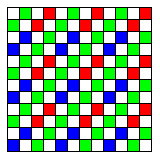
was developed by Kodak. The primary design objective that Kodak had in the development of this design was to improve sensitivity under low light conditions.
SONY, in some sensors it made for smartphones, took a different approach to low-light sensitivity, with what it termed Quad-Bayer sensors.
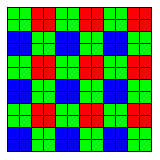
Clearly, by means of binning, this sensor can be made four times as sensitive, by making each pixel four times as large, and the result will be a standard Bayer sensor.
But is it usable outside of low-light conditions?
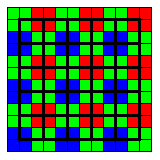
This diagram illustrates that the sensor array still consists of squares of four pixels which contain one red, one blue, and two green pixels each, like a normal Bayer array, so it is indeed usable at full resolution.
In addition to the work done commercially, there has also been academic research on how to design color filter arrays that would be optimum when considering the image in the frequency domain.
A paper by Laurent Condat describes a filter array based on six new colors which differ from those typically used in color filter arrays, but which are still based on a simple RGB additive color model:
                R G B
Unfiltered      1 1 1
Red             1 0 0
Green           0 1 0
Blue            0 0 1
Yellow          1 1 0
Cyan            0 1 1
Magenta         1 0 1
Orange          1 ½ 0
Crimson         1 0 ½
Chartreuse      ½ 1 0
Lavender        0 1 ½
Purple          ½ 0 1
Cerulean        0 ½ 1
The names chosen are my own, to facilitate describing the filter layout, which arranges the six new colors in a repeated rectangle like this:
Orange    Cerulean
Purple    Chartreuse
Lavender  Crimson
leading to a filter looking like this:
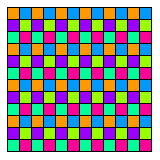
It was inspired by a filter apparently using four of these colors proposed by Keigo Hirakawa:
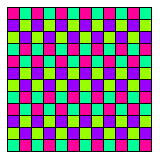
Since the filter is divided into thick horizontal stripes in which only two colors are represented, the design is counter-intuitive compared to the Bayer array and its derivatives.
However, this arrangement suggests a simple way to avoid artifacting, by ensuring that each row and each column contains all three colors:
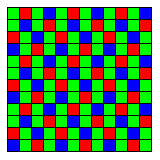
which is less complicated than Fujifilm's X-Trans filter. I wouldn't be surprised if an array of this basic type has already been used, even if I have not happened to encounter a mention of where it was used.
The fact that these six new colors each differ from all the older colors suggests a way to avoid the limitation of the design I proposed above with respect to the Bayer array:
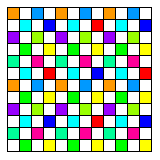
Every second pixel is unfiltered.
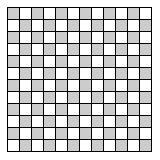
One out of every four pixels belongs to the Laurent array.
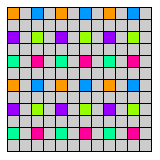
The remaining pixels are divided into two groups:
one out of every eight pixels belongs to a yellow/cyan checkerboard pattern,
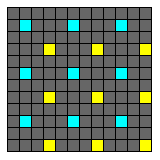
and the last one out of every eight pixels belongs to a regular Bayer array.
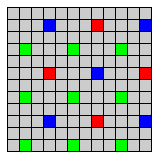
Thus, as the Laurent pattern colors admit one and a half color, they represent an intermediate step between red, green, and blue filters that admit one color, and cyan and yellow filters that admit two colors, possibly slightly further promoting exposure latitude.
One further logical development of the type of filter array represented by Fujifilm's Super CCD design might be as illustrated below:
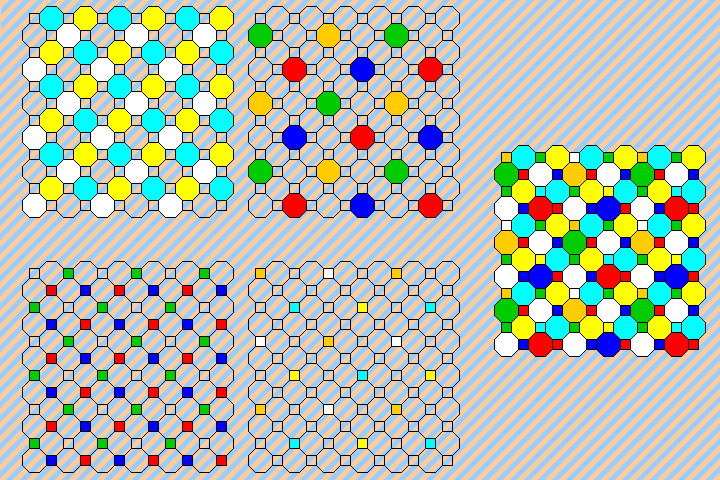
Here, while the difference in sizes is augmented by using unfiltered, cyan, and yellow for the large pixels, and red, green, and blue for the small pixels, instead of unfiltered and green being repeated, as in the Bayer pattern, the fourth cell in each square is reserved for a pattern involving the opposite color series.
Thus, for the large pixels, every square of four pixels consists of one pixel each of unfiltered, cyan, and yellow, and a fourth pixel which may be red, green, blue, or a fourth color, shown as orange in the diagram.
Similarly, for the small pixels, every square of four pixels consists of one pixel each of red, blue, and green, and a fourth pixel which may be unfiltered, cyan, yellow, or again the same fourth color of orange.
The fourth pixel, thus, provides:
Note that in the diagram the small orange pixels are placed immediately above large green pixels, so as to cause the positioning of the small orange pixels to approximate a position halfway between the large orange pixels, thus approaching a doubled resolution in the fourth color.
Something simpler of that general type might be this:
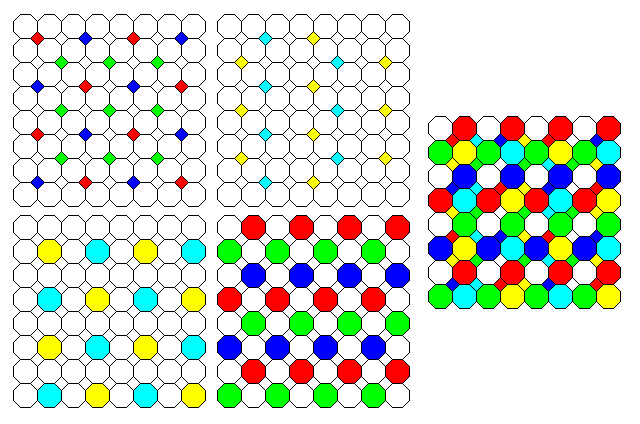
Here, both the large and small pixels are split into two groups, each with half of them alternating diagonally in checkerboard fashion.
For the brightest light conditions, small pixels have red, green, and blue dyes in a Bayer pattern to minimize artifacting. For the dimmest light conditions, large pixels have yellow and cyan dyes, or are left unfiltered, again in a Bayer pattern to minimize artifacting.
Since red, green, and blue dyes in large pixels, and yellow and cyan dyes with unfiltered locations in small pixels both address intermediate light conditions, thus overlapping, a greater density of pixels for two of the three colors is obtained by having the pixels in groups of three, rather than groups of four as in the Bayer pattern. This leads to unavoidable artifacting; so the two groups of pixels are arranged so that the artifacting is in opposite directions for each one, in this diagram, horizontal for red, green, and blue in large pixels, and vertical for yellow, cyan, and unfiltered in small pixels.
One possible idea for a color filter array is this:
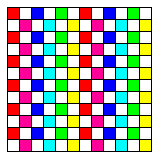
Half the pixels are unfiltered, allowing a monochrome image to be obtained with the maximum possible resolution.
Of the remainder, one-quarter of the pixels are red, green, and blue, and one-quarter of the pixels are cyan, magenta, and yellow.
Any 2x2 square of pixels, if it contains a red pixel, also contains a yellow pixel or a magenta pixel, but never a cyan pixel; similarly, if it contains a green pixel, it will contain a cyan pixel or a yellow pixel, but never a magenta pixel; and if it contains a blue pixel, it will contain a magenta pixel or a cyan pixel, but never a yellow pixel.
In this way, each 2x2 square of pixels in the array contains a set of pixels from which red, green, and blue values can all be calculated: a blue pixel, a yellow pixel, and two unfiltered pixels, for example, would not be able to distinguish between red and green, since both are present in the yellow pixel and the unfiltered pixels, and both are absent from the blue pixel.
This array, by having both red, green and blue pixels, and also cyan, magenta, and yellow pixels, would function in high or low light conditions.
However, by having additive and subtractive primaries strictly alternating, the layout has two obvious problems: each column has filtered pixels of a single color, and the columns cycle through the color wheel gradually in order.
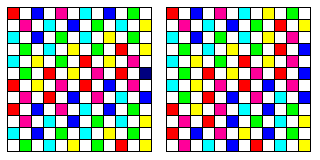
The diagram above shows how this could be addressed; on the left, we see pairs of diagonals following the same sequence alternating with pairs of diagonals shifted so that between the pairs, additive primaries and subtractive primaries touch at the corners; in the one on the left, pairs of diagonals alternate with sets of three diagonals instead for a more varied sequence. But the second one does not seem to be an improvement on the first, since now in the columns, one of the two possible colors predominates.
When additive and subtractive primaries touch ones from the same group, there are two possible choices. Instead of always using the same choice, what if choices are alternated?

As this has become a somewhat complex pattern, I've shown a double-sized extract of it to make it clearer.
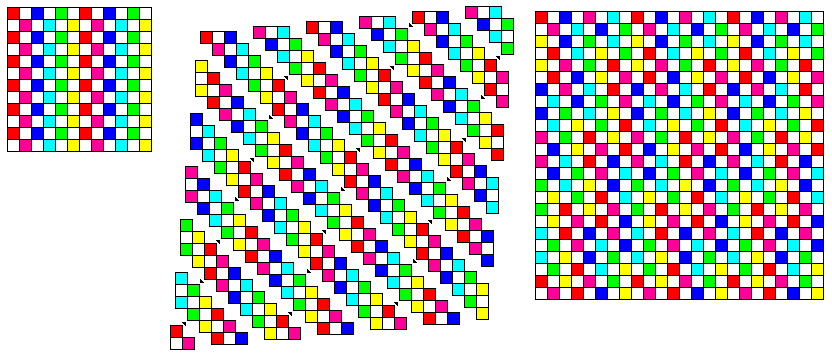
And as that may still not be entirely clear, above is an illustration wherein we start on the left with the original pattern, having the final pattern on the right, and in the middle we show the final pattern broken up into the diagonal areas which are derived from the original pattern.
Note also the arrows between the diagonals. In the original pattern, when going upwards and to the right, red is followed by magenta, while green is followed by yellow. Then, in the next version, between pairs of diagonals, red would be followed by green while green would be followed by blue. Then, in the final pattern, the direction of succession is reversed between alternating pairs of diagonals, so the arrows pointing one way show red being followed by green, and those pointing the other way show green being followed by red.
Also, this makes me wonder if we might not someday see something like this:
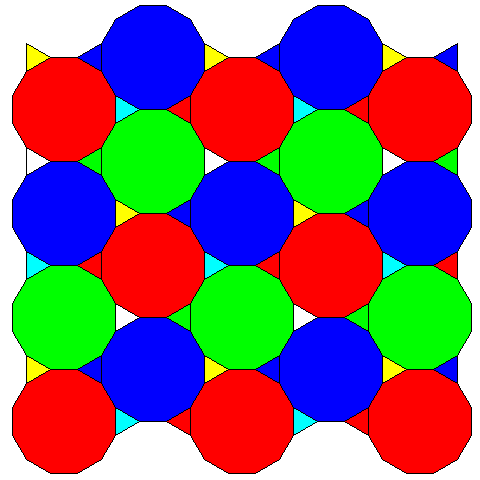
A hexagonal grid with triangular spaces between the main pixels allows dodecagonal pixels, approaching closer to the ideal round shape. While there are an equal number of square spaces between octagons as there are octagons in the previous tesselation, here, there are twice as many tiny triangles as dodecagons.
It was noted above that while yellow, cyan, and unfiltered pixels maximize sensitivity, they leave something to be desired for color fidelity. For this reason, and as well because of the larger size discrepancy between the triangles and the dodecagons, it seems that red, green, and blue filters will be preferred for the dodecagons. But having twice as many triangles, having one set with red, green, and blue filters, and another set yellow, green, and unfiltered would allow an intermediate-sensitivity set of pixels at the target resolution, thus filling in a gap as it is attempted to provide even greater exposure latitude.
If one takes vertical columns of pixels which are staggered in the manner that would make for a diagonal array, changing the spacing between the columns would place the centers of the pixels in the appropriate locations for a hexagonal grid.
While a hexagonal grid is optimum from a theoretical standpoint, both because only three primaries are needed, and because it allows the pixels to be closer in shape to a circle, changing the spacing in that way would not really be beneficial, because the end result of digital photography is to hand the image over to a display or a printer which deals only in square pixels.
Is there a way to bridge the gap between the hexagonal grid and the square pixel?
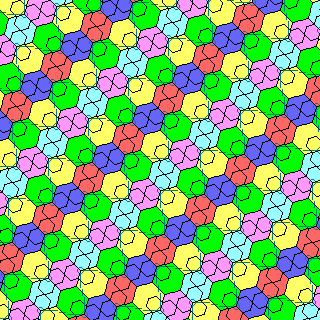
The diagram above suggests one possibility. If one takes a hexagonal grid, and places it at a 45 degree angle in relation to the Cartesian square grid, then there is no bias in favor of vertical or horizontal distances.
Groups of three hexagons are shown that are either red, green, and blue, or yellow, magenta, and cyan. Dark gray zig-zag lines run from the lower left to the upper right, linking the centers of these groups of three hexagons. To make the pixel locations clearer, a group of three half-sized hexagons is centered on each pixel location.
The circled centers make an approximation to a square grid of pixels, distorted by small displacements. But there is also a small slope to the near-vertical and near-horizontal lines of pixels in addition to the alternating small displacements, which can be corrected by applying a small stretch to the hexagons along the axis going from the upper left to the lower right in the diagram, as this diagram shows:
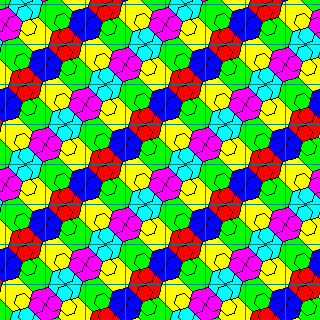
Each point on the square grid is adjacent to three hexagons which are either yellow, magenta, and cyan on the one hand, or red, green, and blue on the other. Adjacent points on the grid will sometimes share the same hexagon for one of the three colors. It could be argued that for a given minimum pixel size, an array of this type would be suitable to providing a higher effective resolution than a conventional one, since it uses less than three sensing elements, rather than four sensing elements, to make a point with data from all three primaries. Due to the occasional overlaps, of course, not all of that resolution is real.
The alternation between red, green, and blue triangles and yellow, magenta, and cyan triangles in the diagram is simply done for clarity; in practice, only three primaries need be used.
One could leave gaps between the hexagons to still be able to use real hexagons, as shown here:
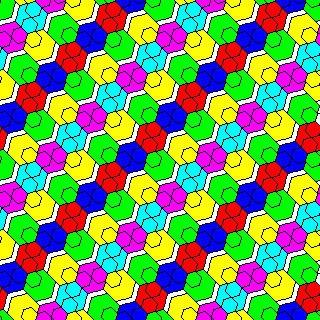
But, if gaps are left to put real hexagons in a square array, one attempt to come up with something simpler, by repeating a tilted group of three hexagons in a square pattern, ends up leaving room for a fourth:
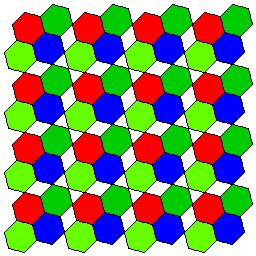
If the goal is to treat three colors equally, without the duplication of the Bayer array, and yet use a square pattern to generate square pixels, there's always
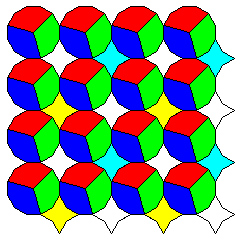
as a simple way to achieve partial success.
Something that might be simpler in one way than the pattern with stretched hexagons, although more richly structured, is the following:
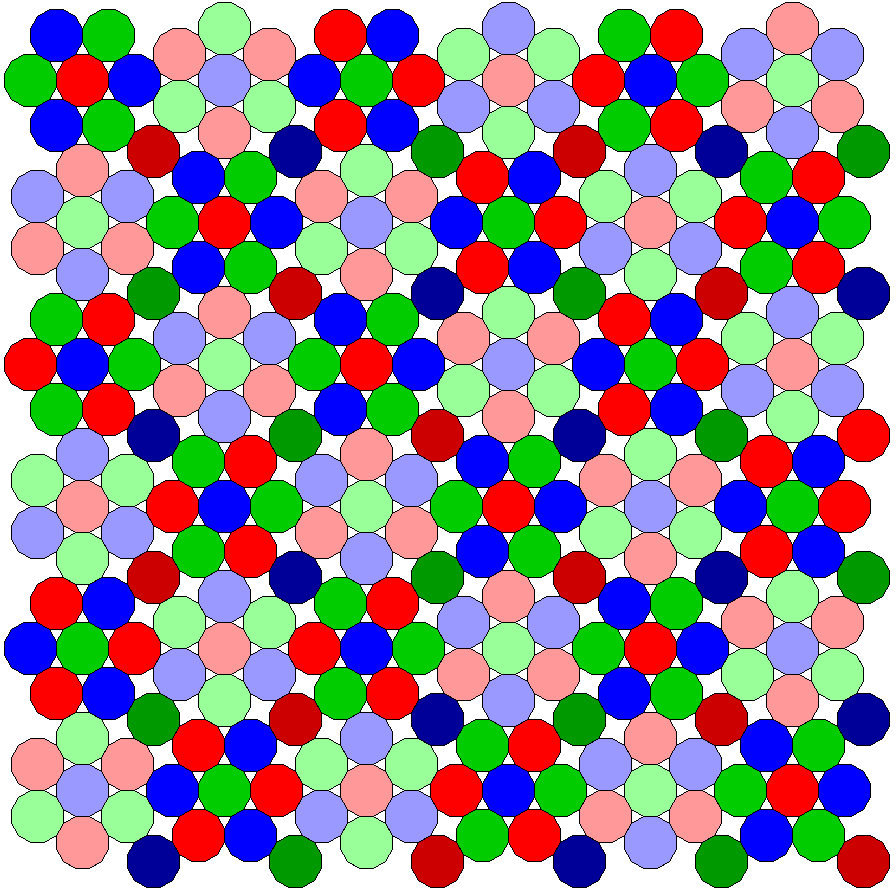
While the pixels are actually only in the three additive primary colors, red, green, and blue, the hexagonal groups of seven dodecagons in one orientation are shown in a normal red, green, and blue in this diagram, and those in the opposite orientation are shown in a lighter shade, and extra dodecagons between the groups are shown in a darker shade of red, green, or blue, so as to make the structure of this array clearer.
It could be claimed that this array provides a real advantage over conventional arrays, because some of the round pixels, being in hexagonal clumps, are closer together than they could be in a square array. But this only increases resolution for part of the picture, there being tilted square groups of nine pixels in the corners between the hexagons where resolution would only reach its conventional value for the given pixel size. The four-pointed stars which are the gaps between pixels in those areas could have smaller pixels placed in them, which could be used to improve resolution as well as to provide greater exposure latitude. And, of course, the complexity of the array would help reduce artifacting.
This diagram shows how a grid of the structure shown above
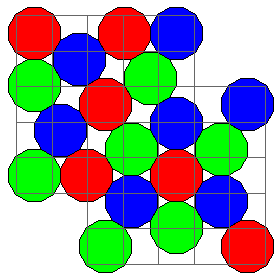
would serve as the basis for interpolation which would convert it to an image composed of square pixels. The highest-resolution result, preserving all the information sensed originally, would have to include more pixels than its resolution would warrant, due to the difference in arrangment of the sensing elements and the output pixels; thus, 16 pixels in the image with square pixels would correspond to eight image sensing elements in the original grid.
Thus, the idea of rotating the array by 45 degrees might occur to one, as a way to make the number of pixels in the final image correspond exactly to the number of sensing elements. But since the density of sensing elements is higher in the hexagonal areas, and lower in the square areas between them, that would not entirely eliminate the intrinsic resolution of the image, as it was sensed, being lower than that of the output presented on a rectangular grid. Thus, leaving the array as it is allows a higher resolution for the first level at which no spurious resolution exists by halving the maximum resolution in both directions.
Even having eight different response curves to play with does not allow some linear combination of them to match, exactly, from one end of the spectrum to the other, to match either the response curves of the three pigments of the eye, or the response curves of the three psychovisual stimuli used in the CIE chromaticity model. Given that, what is the point? Isn't it a case of diminishing returns?
Given three types of color filter, it is possible to derive values for hue, saturation, and brightness. Using the hue value as an indication of a dominant wavelength, considered to be mixed with a certain amount of white light if desaturated, one can then take the light curves of the filters used, and the response curves to be approximated, and select which part of a piecewise approximation to the desired curve is to be used. This critically depends on the accuracy of the initial estimate of color balance, and it works less well as colors become less saturated. But it still seemed to me that this is the way to extract the most useful color information from an expanded set of color filters, each one with its own peculiarities. However, it does have one major pitfall. The "dominant wavelength" of a colorful part of a scene need not actually correspond to the actual wavelength of light supplied in excess by that part of the scene; an area whose color is yellow, for example, might be supplying a mixture of green and red light to the image sensor. Attempting to interpret its color by the response curves of the detector in the yellow portion of the spectrum would be useless and irrelevant. This is even more obviously true in the case of vivid purples.
A scanning back for high-resolution photography was mentioned at an earlier point on this page. One could even solve the problem of color rendition in photography by using a conventional two-dimensional image sensor, without a filter array, with suitable optics so as to obtain, for each point in a vertical line through the image, a complete spectrum of the light at that point. Moving the line through the image would provide a complete description of the light from each part of the image.
In thinking of this, it occurred to me that when the very long exposure times, or very bright light, needed to scan an image this way is not available, data for one or a few lines might provide information to correct the color for important areas of the image. A horizontal line through the image seemed to me to be more likely to include many of the major areas than a vertical line for types of subject of interest.
The same source for early color photography that provided information on the Dufaycolor and Finlay processes, among others, mentioned Lippmann color photography. This used plates of a type that would later be suitable for holography (and, incidentally, both Gabriel Lippmann and Dennis Gabor won Nobel prizes for their work!), with a reflector behind the plate. Interference patterns in the film, when it is developed, and the reflector removed, provided uniquely vivid colors. Could there be a way to take a CCD image sensor, and somehow move it through the layers within a Lippman photograph? Almost as soon as the thought occurred to me, I realized that this could be done by means of some type of interferometer: the device known as a Fourier-transform spectrograph. Imaging Fabry-Perot interferometers are used in astronomy; they produce an image which needs a Fourier transform to become a spectrum, but along a spatial direction, rather than in time as the type of device I thought of at first.
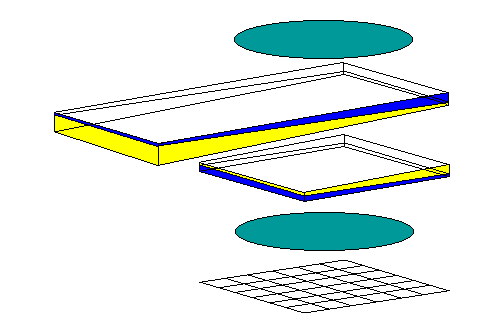
It seemed to me that using polarizers would provide a compact way to perform beam splitting, without the need for two legs of an interferometer extending out at right angles. After considering a few notions, I finally realized that a simple device of this class could have the form shown at right:
Two wedges of birefringent material, moving in opposite directions (in fact, only one wedge needs to move, for even greater simplicity) allow the thickness of birefringent material between a crossed polarizer and analyzer to be varied. This permits a continuous variation in the difference of the lengths of the optical path between the ordinary and extraordinary rays. Wedges of glass, a non-birefringent optical material, in the opposite direction are also present, so that the optical distance to the imaging sensor remains constant, allowing the image to remain in focus. (The thickness would, presumably, be based on the average of the indices of refraction in the birefringent material for the ordinary and extraordinary rays.)
At the bottom of the diagram is an unfiltered image sensor, whether a CCD or of the new CMOS type; it would not need to be high-resolution, but in order for the device to be usable, it should both be very sensitive, and designed for extremely rapid readout. A device formed from two birefringent wedges for Fourier-transform spectroscopy or for use in microscopy, but without the additional glass wedges shown, is known as a Babinet-Soleil compensator; these are very expensive. For the purpose of color correction in photography, it is not necessary to achieve wavelength resolution to a fraction of a nanometer; a resolution as low as 10 nanometers would suffice. Also, the use of a small detector, and hence small wedges of calcite, can be achieved by one of the artifices discussed in the section below.
It may also be noted that a piece of birefringent material of uniform thickness, rotated by 90 degrees from that in the two wedges, whose thickness corresponds to the combined thickness of the two wedges in their minimum-thickness position, can be added to the device so that the motion of the long wedge inwards to increase the thickness can start from a position yielding zero path difference. This slab can be made from a different material than that used for the two wedges; they should both be of the same material, so that they can more easily be made to match, giving a uniform spectral composition of the light they allow to pass through the device at any position. This characteristic is not a necessity, if the Fourier transform performed for each pixel is independent, but it ensures uniformity across the whole area of each pixel, which is directly useful.
Particularly in scenes including reflections and glare, it is possible that the polarizer, by rejecting some incident light on the basis of its polarization, will change the image from that taken by the main sensor without polarization. Since the axes of polarization of the polarizer and analyzer, 90 degrees from each other, are also 45 degrees from the two axes of polarization of significance in the birefringent material used, the simplest way of dealing with this, without either rotating the whole device, or enduring additional light loss by putting a single movable polarizing filter in front of the device, is by rotating both the polarizer and analyzer by 90 degrees to take a complementary image. With this approach, however, precise alignment is essential.
As the long wedge moves, the image may shift in position. While this could be compensated for digitally, it would be better to keep the boundaries of each cell of the detector constant. To do this, the non-birefringent glass should have the same index of refraction as the mean of the two rays in the birefringent material, so that the sliding portion containing the moving wedge of birefringent material can have two parallel sides.
Another problem is that the cones of light focused by the camera's lens will not all pass through the same thickness of the birefringent material. This can be dealt with by putting a field lens in front of the device, focused on the image of the entrance pupil, so that all the cones will point in the same direction, followed by repeated concave lenses, one for each pixel of the detector, to act as Barlow lenses, making the cones of light long and narrow. A grating baffle, to prevent light crossing pixel boundaries, would also be needed. Since that arrangement could not eliminate an unavoidable loss of light, one could also use the field lens only, combined with stopping down the main camera lens.
This may be the device described in the 2002 paper by Zhan, Oka, Ishigaki and Baba or one very similar to it. A 2004 paper by Harvey and Fletcher-Holmes describes a device based on a related principle. However, a 1983 British patent notes the use of the Soleil-Babinet compensator in Fourier-transform spectroscopy (it proposes rotating a plate of birefringent material as a superior alternative for some applications), so this principle may be older than that.
Photographic film came in several different sizes, and different cameras made use of the same type of film in different ways, leading to a number of different shapes and sizes for film frames:
110 film cartridge
 17mm wide    13mm high
[16mm wide    12mm high  may actually be used for prints]

Kodak Advanced Photo System
 30.2mm wide  16.7mm high

35mm film (Image area: 24mm across)
 24mm wide    18mm high   (movie film)
 36mm wide    24mm high   (35mm SLR)

127 film (Image area: 40mm across)
 40mm wide    40mm high
 60mm wide    40mm high

120 film (Image area: 60mm across)
 60mm wide    45mm high   (645)
[56mm wide    41.5mm high  may actually be used for prints]
 60mm wide    60mm high
 70mm wide    60mm high   (6x7)
In the case of a CCD image sensor: a CCD sensor is, of course, a microchip. And, just like a microprocessor, chip size strongly decreases yields.
Some common CCD sensor sizes are:
1/2.7" size
  5.27mm wide 3.96mm high

2/3" size
  8.8mm wide  6.6mm high

4/3" size
 17.6mm wide 13.2mm high
At first, for this reason, ordinary consumer digital SLR cameras tended to use the 4/3" size of sensor, which, at 17.6mm wide and 13.2mm high, is significantly smaller than the 36mm wide and 24mm high frame used in a 35mm SLR. The rule of thumb for comparing focal lengths of lenses is to multiply the focal length of the lens for that format by two to get the focal length of an equivalent 35mm SLR lens. Some manufacturers continued to use the smaller sensor size so as to be able to offer small and light cameras.
Other digital SLR cameras used sensors which were about the size of the film frame used in Kodak's APS, 30.2mm wide and 16.7mm high, thus more closely approaching the 35mm SLR frame size. There is some variation in the sizes of sensors in this range; for the smaller ones, the focal length of lenses is multiplied by 1.6 to get that of an equivalent SLR lens, and for the larger ones, the multiplication factor is only 1.5.
Image sensors are manufactured in the full-frame size of 36mm wide and 24mm high. The larger size, because it lowers yields, makes these sensors more expensive, but they are used in a few cameras.
Canon makes two 35mm cameras with full-frame sensors, the EOS-1D and EOS-5D, Kodak once sold a professional SLR custom made for it by Nikon with a full-frame sensor as well, the DCS 14n, which had the DCS Pro SLR/n and the DCS Pro SLR/c with full-frame sensors as successors, and apparently the very first digital camera with a full-size sensor was the Contax N Digital.
Sensors of the 36mm by 24mm size are more commonly used in replacement digital backs for large-format cameras, designed for an even larger film size. However, technology continues to advance. Thus, three recent products intended for medium format are:
Medium format cameras using 120 film could have a frame that was 56mm wide and 41.5mm high; only slightly larger than these sensor sizes.
Since this page was originally prepared, though, semiconductor technology has marched on, and it has now become practical to make sensors in larger sizes. Although the resulting products are still expensive enough to be mostly intended for serious professional photographers, this still constitutes a significant improvement over the previous situation.
Two products in this range are:
Progress continues. Now, some digital SLR cameras with full-frame sensors are available very inexpensively on the used market.
Hasselblad has scaled back its medium format sensor sizes somewhat from those mentioned above, with a sensor that is 43.8 by 32.9 mm on their recent X2D II 100C camera.
Many years ago, Pentax made an SLR camera with a series of interchangeable lenses using 110 film. The frame size of this film is 17mm by 13mm, although there is reason to think that the intended size to be used was 16mm by 12mm, giving a 4:3 aspect ratio.
This would at least enable some people to save money by using their existing collection of SLR lenses with a digital camera that is reasonably priced!
Most ordinary digital cameras use much smaller sensors than the 4/3" size; as noted above, one common size is the 2/3" size, 8.8mm by 6.6mm, another the 1/2.7" size, 5.27mm by 3.96mm.
That is much smaller than the frame size even for 110 film; in comparison, old-style 8mm film had a frame size of 4.5 mm by 3.3 mm, so at least that was smaller than most digital sensors. Of course, even 35mm film used for shooting movies had a 24mm by 18mm frame size, that for still photography being doubled from the size used in the movies.
For example, one could think of an image sensor being 6mm by 4mm in size, for which a lens with an 8mm focal length would be the equivalent of one with a 48mm focal length used in a 35mm SLR. The normal lens for a 35mm SLR has a 50mm focal length, though some brands of cameras used 52mm or 53mm lenses instead, so as to make it easier to achieve the required back focal length. 51mm is at least divisible by three, so one could consider a lens with an 8.5mm focal length to be the normal lens for that format. But a digital SLR of that size would almost require you to look through the pentaprism with a microscope rather than just a strongly magnifying eyepiece. Lenses for 8mm film cameras were still a reasonable size to handle, because they used optical constructions that would have been excessively bulky for larger formats, and thus at least one is not talking about tweezers being required. And a micro SLR would have the advantage of less recoil when the mirror flips out of the way.
Still, many people have old 35mm cameras with many lenses for them. Is there any cheap way to provide the equivalent of a 36mm by 24mm sensor?
A number of silly ideas are certainly possible, but the simplest would be to place a field lens where the film or sensor would be, and then use a camera of any desired degree of smallness, with a fixed-focus lens, to record the image within the field lens. Using additional lenses, of course, means this wouldn't provide the sharpest possible images, and such a scheme clearly risks making the camera bulky, unless one finds a good scheme of folding the optical path.
A molded prism in front of the focal plane might allow splitting the image into strips for multiple, smaller, sensors, but I suspect the results of that would be questionable. As noted above, the Better Light back provided full-frame images for large-format cameras, so a scanning back of some kind is another possibility.
Making a single-line sensor start moving at a uniform rate from a standing start poses some technical challenges, as does having a flexible electrical connection that can survive repeated motion. The mirror in a single-lens reflex camera that is used to reflect the light that would normally form an image on the film to the ground glass plate of the viewfinder suggests another approach.

Instead of having the mirror flip up to block stray light from the viewfinder eyepiece, a shutter could slide in from the side in front of the ground glass plane to do this, Better yet, two halves of the shutter could slide in simultaneously from opposite directions to minimize camera motion. In the meantime, the mirror could move, guided by cams, so as to sweep the reflected image of a single-line sensor along what would have been the film plane, as shown by the three images on the right of the diagram above.
Incidentally, a simple mechanical linkage can be used to work out the desired sequence of mirror positions, although it doesn't appear to be the ideal way to move the mirror in practice.

The starting position for taking an image would not be the same as the 45 degree position for SLR preview, in order that the image sensor could be located somewhat away from the forwards edge of the ground glass screen. To provide the same performance as a standard film SLR, the entire sequence of mirror motion for scanning an image would have to take place in 1/125th of a second, or 8 milliseconds, although additional time would be available for the mirror to return to the starting position. Presumably, the mirror would go through the sequence at least once after beginning to move before the picture is actually taken, so that it would have gotten up to speed, and the motion of the image of the single-line sensor along the image plane would be uniform, when the image is actually captured.
In a 6 megapixel camera, taking a 3,072 by 2,048 pixel image, the sensor would have to be read out once every 4 microseconds; not only is that daunting enough, but the read-out would reflect 4 microseconds' worth of exposure of each pixel-sensing element to light. Reducing the resolution to 1,536 by 1,024 pixels, for a 1.5 megapixel camera, would only double the time to 8 microseconds, but would at least also multiply the light-collecting area of each pixel by four.
An arrangement of sensing elements that would allow the maximum possible collecting area for different choices of resolution is illustrated below:
![]()
the red outlines showing how the sensing elements could be combined to form square pixels of various sizes. While the arrangement of color filters for a cyan/yellow/unfiltered scheme is shown, this is a situation where the technology from Foveon, which attempts to use all available light for each pixel, would be particularly beneficial.
It would not surprise me, however, even though this seems infeasible with current technology, if this principle has been used already, perhaps for autofocusing purposes in film cameras.
It seems to me that this method, using a mirror that is already present, should minimize manufacturing cost of a scanning-back SLR (although the image sensor would be on the front, not the back).
More likely alternatives might include fault-tolerant chip architectures, or the use of fabrication methods other than microlithography, such as are used in the making of active-matrix LCDs. On the other hand, one could also note the possibility of exotic alternatives, like the scanning of a sensitive photochromic plate.
Also, one could replace the flip-up mirror by a pellicle, as in the Canon Pellix SLR from 1965, except one that reflects half the light each way; in the film plane, one would have a set of small sensors, covering the full height of the picture in several strips with gaps between, and a second set of small sensors would slide in at the top, replacing the focusing screen, to fill those gaps. Thus, one might have five sensors, each 24 mm by 5 mm, in the film plane side by side, with a 3 mm spacing between their active areas, and four such sensors, with similar spacing, on a sliding element beside the focusing screen, to cover the 24 mm by 36 mm image area. Even such sensors, though, would have more than twice the area of a 2/3" size image sensor, and thus would still have a relatively lower yield and higher cost. This still seems like the most practical scheme for an inexpensive equivalent to the full-size image sensor with present technology.
The following diagram
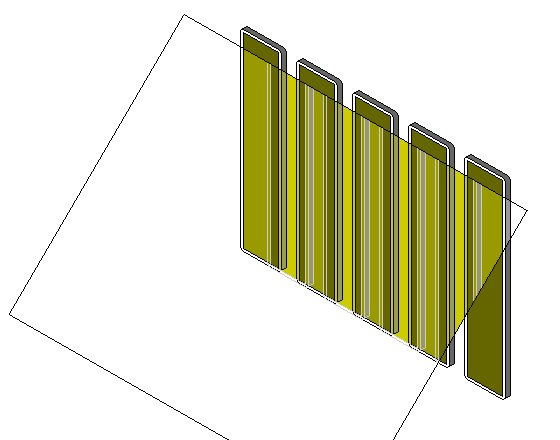
may make the scheme proposed a little more understandable. In the diagram, one can see that in the semi-reflecting diagonal mirror, a set of distinct sensors is reflected that are similar to the ones behind the mirror in size and spacing, but which are located so that their centers coincide with the gaps in the ones behind the mirror.
For the more general case, where it is desired to build an arbitrarily large image sensor from component sensors having a necessary gap on all sides, and a fixed maximum size, since one array of small sensors will still leave a continuous area which is not covered, it is necessary to combine at least three such arrays to achieve coverage without gaps.
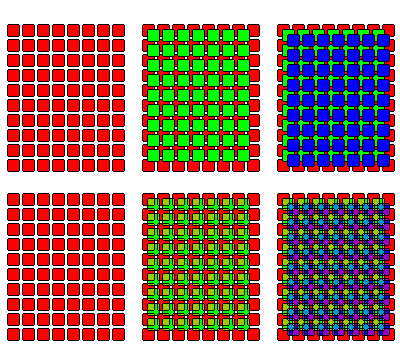
Even then, some care is required to achieve the desired result; one possible scheme is illustrated above.
Since dividing incoming light into three parts, only one of those parts being used for at least some areas of the image, is inefficient, this makes it frustrating to use this method for the construction of large image sensors for use with astronomical telescopes, whether it is done through use of partially-silvered surfaces, or by moving the sensor diagonally between component exposures.
Of course, since just a single array could cover over 95% of the image, since while some wasted border is necessary on each side for most types of image sensor, this waste can be minimized, one could increase efficiency above 33% simply by using more than three displacements; for example, if one used eighteen possible positions for the array, one could arrange things so that no point on the image is covered by less than eleven of those positions.
This would be done by having six sets of three positions arranged so that the small areas in each set of three positions covered by only one of the three positions never coincide. The minimum of eleven positions out of eighteen is based on the worst case of coverage by only two of the three positions being possible for the other five sets of three positions; in practise, efficiency could be better than that, I suspect, but control over the case of two out of three positions is much more difficult, so twelve or thirteen out of eighteen is probably the best practical performance if only eighteen positions are used.